 |
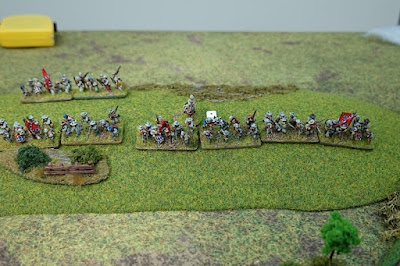
| The Confederate respond to Union movement. |
This is the last of three posts, which have looked at taking a small slice of action from a boardgame and converting it to a figures game. Having identified our slice of action in the first post (see link below) and then converting it to a scenario (see link below for second post), we finally get to moving some figures around the table, with a focus on ‘that bridge’ and ‘that high ground’.
For the rest of this post, please use the ‘read more’ tab.
For full details of the scenario, please see the previous post (link in the Resource Section below).
In brief, a Confederate brigade under General Brigadier Toombs, occupies high ground, which has a steep forward slope and which dominates the Burnside Bridge exit. The Confederate regiments are ‘small’, but with good morale. There are some Confederate reinforcements due, but their arrival is randomised.
A Union brigade under Welsh are in the process of pouring across the bridge, with a view to attacking up the slopes and clearing the heights before them. They have the lead elements of Nagle’s division following up behind them, plus a regiment from Col. B Christ’s Brigade is taking protection from the wall at the ploughed field.
Can the Union take the heights before reinforcing Confederates interfere with their plans and thrown them back across the creek? The contrast in the situation is that the Confederate regiments are small but with good morale, while the larger regiments of the Union have the numbers, but standard morale, plus and a couple of units in their force have been freshly raised.
For rules we are using Black Powder with bits taken from the Glory Hallelujah supplement. Measurements are not amended and the figures are 12mm from Kallistra. The table is 4’ wide by 3½’ foot deep.
The map shows the main terrain features and opening dispositions of the two forces.
Here is a very short video trailer that shows the terrain and opening Confederate response.
The scenario demands that the lead Union unit takes some pre-game fire from the Confederates to represent the losses that they would have taken whilst dashing across the 125 foot bridge. The 46th New York suffer 2 losses from that.
Turn 1 (1100 hours).
Overview - Welsh manages to spread his two lead regiments out to the wings, making room for 45th Pennsylvania to move off the bridge and take the centre.
Since the two wings have only taken one move, they can also fire and 2nd Georgia (on the Confederate left) take two hits, which is enough to make these small regiments go ‘shaken’. 15th Georgia on the Confederate right, ensconced in the shelter of a ravine, are unscathed.
17th Georgia from the reserve line move down from the rear left to take up position on the left, extending the Confederate line to match Union movements.
Notable activity - The excellent Toombs moves towards 2nd Georgia, shouting ‘Rally on me boys!’ and he successfully removes one of their two hits - this leaves them with 1 hit and recovers them from shaken status.
Turn 2.
Overview - The union make a steady advance up the lower slopes (costs double movement), bringing both wings to the very foot of the steep slope. This is a very precarious situation for Toombs, as from here, the Union regiments will be able to charge up the last bit of slope and their larger numbers could likely overwhelm Toombs’ Division.
Toombs wants to bring 20th Georgia down from the second line reserve to extend his right, but he is deeply concerned about his centre (2nd Georgia) and decides to hold 20th back to maintain a reserve.
The close range Confederate fire is tremendous and causes both of the Union flanks to go ‘shaken’ and the Union right also goes disordered. This is going to put a dampener on any Union plans to rush the defenders until they reorganise. Toombs has bought some much needed breathing space as a firefight develops.
Looking over his right shoulder for reinforcements, Toombs demands ‘where is Drayton!’
Notable activity - the last of Welsh’s regiments clears the bridge, which under the special rules activates Nagle to enter the game and bring his reinforcement on at the road in the next turn.
Turn 3.
Overview - The Union methodical advance is now putting the Confederate line under significant pressure. In the Union centre, smoothbore armed 45th Pennsylvania and newly raised 8th Michigan form up in column of regiments ready to charge the centre. Close range Union fire hits everything along the line, but Toombs does splendid working in keeping his regiments in order.
Toombs decides to release 20th Georgia to extend his right, he is now without any reserve and is desperate for reinforcements to arrive.
Notable activity - or rather lack of it! Nagle arrives with his reinforcement of his two lead regiments, though is apparently in ‘no rush’ and halts while he sends riders out to Brigadier General Willcox.
Turn 4.
Overview - Welsh orders his division to charge up the steep part of the slope, which they all do, except the 100th Pennsylvania on the right wing, who are shaken.
As the charge goes in, they are met by devastating Confederate close range fire. 45th Pennslyvania on the Union left take such severe casualties that they leave the battlefield. As the sides clash the Confederate centre gets the worst of it, yet they manage to hold on to this part of the line.
Worryingly for the Union, their left flank is now open and exposed by the loss of 45th Pennslyvania, Confederate 20th Georgia move down to the lower slope and start to envelop the Union open flank.
Drayton’s two lead regiments make the battlefield on the Confederate right, but he halts while trying to make out what is going on at the hill. The reinforcements of both sides have lacked a certain energy so far!
To prove the point, Nagle does nothing!
Notable activity - 2nd Georgia in the Confederate centre, having borne the brunt of the fighting throughout, eventually collapse, leaving a gap in the line and amongst all of that chaos, Toombs, who was in the thick of it, is hit and has to be carried away. The Confederates have lost their charismatic leader.
Turn 5.
Overview - With less than polite orders from Willcox, Nagle hurries to the front and places himself ready to support the first assault at the steep slope. Elsewhere, the swirl of close combats and firefights continue. In the Union centre, the catastrophic losses suffered by the 45th Pennsylvania during their charge, has their morale plummet and the subsequent Confederate fire sees them off!
Notable activity - a test is taken to see whether the game ends, but it moves along to the next turn. The Confederate reinforcements are making their presence felt as Drayton’s column starts to make the climb up the rear of the hill on the Confederate right, while on the left Col. J. Walker’s 1st South Carolina arrive on the road.
Turn 6.
Overview - Having lost two regiments already and with enemy reinforcements arriving to threaten both of his flanks, Willcox orders the retreat back over to their side of the creek.
With supporting fire from 28th Massachusetts, from their cover at the walled field, 100th Pennsylvania, despite being shaken and taking fire during the retreat, manage to take up the rearguard, ensuring that the rest of the division got safely across the bridge, before they join the escape.
The Union decision was a great relief to the Confederate side as they were not so certain that it was all over for the Union. But with strengths now roughly equal and the Confederates having a defensive advantage, while also out-flanking the Union, the retreat was not wholly a surprise.
The scenario made for an interesting game, especially with the randomness of the reinforcement schedule set by the scenario, plus the effects of the disorder results and failing orders that is a main part of the Black Powder engine, making the situation quite replayable.
What went wrong for the Union
There were three single moments that contributed to the Union failure to push Toombs off the hill. Firstly, early on, effective Confederate fire caused a pause to the Union attack by creating shaken and disorder results. Then, on the turn before the charge, the Union had a dire turn of shooting, which should otherwise have weakened the Confederate resolve. The small Confederate units only have a stamina of 2 and good firing at this point could have only assisted the charge. Finally the delays of Nagle (delightfully caused by the system), prevented a strong Union hand to be played before Confederate reinforcements were in a position to threaten the attack and the end of the game grew closer.
It was good to see that the scenario worked pretty well from the start and the only tweak I gave it was to reduce the game from a maximum of 8 turns to 7 and to make turn 4 an automatic turn of entry for Drayton if he has not already arrived.
For Victory Points, the 2 regimental losses by the Union compared to the single loss by the Confederates (plus Toombs of course!), gave a Confederate victory. In the end, that felt right as the Union had abandoned the field.
Thanks to all who have followed the trilogy of posts covering this action. The earlier posts have a link in the Resource Section below.
I have run a few figure games that have fallen out of situations created during the playing of a boardgame and so far, they have not failed to entertain and that includes doing the research that develops the battlefield detail and refines the orders of battle to represent the breakdown of brigades into regiments etc. More to follow I think, but perhaps condensed to a single post, rather than repeating design process etc.
Resource Section.
Blogged AAR of the Burnside Bridge boardgame scenario that generated this action (first post). LINK
http://battlefieldswarriors.blogspot.com/2020/10/burnside-bridge-1862-part-1.html
Blogged creation of the conversion scenario (second post). LINK
http://battlefieldswarriors.blogspot.com/2020/10/burnside-bridge-1862-part-2.html


0 Comments