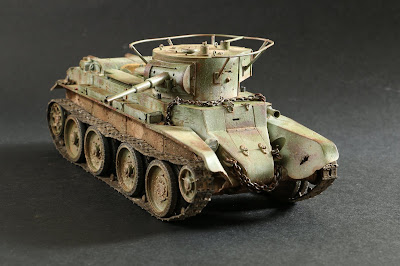
As ever with my approach to weathering, layers are the key. There is no 'correct' order for this but there are some things to bear in mind. So, adding rust chips after applying pigments or airbrushing dust effects makes little sense because in the real world dust lands on top of these layers. Having said this, it is perfectly possible to go back over effects again, and I certainly did this at several stages of the process outlined here.
It might be argued that weathering began with the use of the chipping fluid on the paint, and a case can certainly be made for this. Nonetheless, I've described the painting process in a different blog and what's outlined here entails adding layers to that paint.
I would normally start with a pin wash but this time I decided to experiment with a different starting point, so I added some rust chips with 301 light rust, then 302 dark rust, applied with a sponge. This gives depth and variety to the rust effects which were created with the chipping fluid, and you can see some of the result above.
I then did some very fine streaking and rendering using 820 offwhite with 956 glaze medium rather than oils, again as an experiment. The paint was streaked in a very controlled way with Tamiya thinner and I was pleased with the very subtle result.
This was followed by a pin wash with burnt umber oil paint and at this point I regretted not starting with the pin wash, so there's a lesson learned. It tended to level out the previous layers so in some instances I went over them again. I also did some rust streaks, but wanted to keep this to a minimum.
Next I used the airbrush to apply heavily a thinned layer of XF-57 Buff over the whole model, before adding more noticeable layers of this, XF-52 Flat Earth, and X-9 Brown in chosen areas, notably the lower portion of the turret, the area around the wheels, and the underside of the tank.
This was followed by a mix of XF-1 Black and XF-64 Red Brown which was applied to the gun muzzle and the exhaust area.
I should add that I made no particular effort with the exhausts - the same layers were applied to them as elsewhere. Nonetheless, the cumulative effect is pleasing I think.
Once this had dried I went over the tank with a graphite stick to highlight edges, areas of polished rust, and so on.
This is a particularly effective stage in bringing out a sense of rusted metal and I went back to it several times.
Next I decided to try an experiment with the application of pigments. Previously I've added the accumulated mud in the wheel areas using a brush, and spattering was done by using a brush which was flicked with a finger. This is OK but control could be better so I took the opportunity to try applying it with an airbrush.
I was very pleased with the way in which this went. I applied Mig pigments from light to dark, suspended in Tamiya thinner in various thicknesses, loaded onto a brush and then blown onto the model with the airbrush.
Application was much more controlled, with no pigments applied where I didn't want them, the effect was more realistic I felt, it was a quicker process, and to be honest it was a lot of fun. I will certainly be using this approach again in future.
I then applied some AK Damp Earth to selected areas, notably join lines and the areas just below the mud guards. You can see this above represented by the darkest areas.
Of course there are other ways of using pigments, and I used dry pigments on some of the upper surfaces, such as the turret roof, and on the tracks. These pigments were used sparingly, again simply adding layers in key locations. I was particularly pleased with the effect achieved on the driver's hatch using Mig Europe Earth.
I then added AK oil effects in key areas, notably the fuel cells running along thesis of the tank. These were applied neat, and then thinned in situ using enamel thinner.
At this point I had the chance to sort out various fittings, such as the lights, spare tracks at the rear, leaves, and so on. The chain was added at this point, but I should make it clear that I split the chain supplied with the kit in two, with one added to the front of the tank and the other draped across the area in front of the turret. There is an image on the inside cover of Steve Zaloga's useful Osprey book on the BT tank series which includes a chain used in this way and I quite liked the look.
At this point the various layers were complete and the macro lens has provided a particularly effective sense of the accumulation of different layers in the image above.
The final task was to fit the wheels and the tracks. There are 74 individual links for each side and it was a tight fit, but these tracks give a very realistic effect. There is nothing wrong with the kit parts and they are certainly an accurate reflection of the early version of the tracks used by this mark, but they would have been upgraded to the later version further down the line, and these Friul tracks look excellent.
So that's it for this kit. It lived up to expectations in terms of the fit, accuracy, ease of construction, and the chance to experiment with snow camouflage. I certainly recommend the Eduard PE upgrade set and although I had some issues with constructing the Friul tracks, they do look good.
As usual, the best thing about this kit has been the way in which it has provided challenges, and as a result it has been a very useful distraction from work. I'm very pleased with the final piece and recommend the kit without hesitation. Next I'll be making some progress on the Eduard Se5a which I reviewed some time ago.
Happy modelling.
Nick
Ticker
6/recent/ticker-posts
Popular Posts

How to Apply Makeup in High School?
July 20, 2022

Hamed Junior Traorè Face (Empoli) - PES 2017
October 04, 2022

Need For Speed The Run PC Full Free Version Download
June 08, 2022

Towards Tu Tap 276 Gj Johnson Electrical Fc De Kampioenen.
September 08, 2022

Apex Legends PC highly compressed (699 MB100% working)
June 07, 2022
Random Posts
5/random/post-list
Popular Posts

How to Apply Makeup in High School?
July 20, 2022

Hamed Junior Traorè Face (Empoli) - PES 2017
October 04, 2022
Menu Footer Widget
Copyright ©
antilat


0 Comments